Ghost theme documentation basics + using them to update my site.
As I started to update my site this week, I realized that I haven't documented just how I update my site and what critical parts of the Ghost documentation I rely on to build the customizations I need. Here's a quick preview behind the scenes of what I did to update my site recently.

I've been a fan of Ghost for basically forever. The site is a nonprofit organization that genuinely embraces open source and makes it easy and accessible for those who want to self-host their content as well as start to get their hands dirty in theme customization or content creation, to do so.
As I started to update my site this week, I realized that I haven't documented just how I update my site and what critical parts of the Ghost documentation I rely on to build the customizations I need.
Here's a quick preview behind the scenes of what I did to update my site recently.
This blog post is for you if...
- You're using Ghost and want to learn the basics of theme documentation.
- You're looking to make minor adjustments to your ghost.org site.
- You want to see the process of how I update my site.
What you'll need before beginning:
- Basic understanding of how to use a code editor, structure files, and HTML, CSS, and handlebars.js
- How to download a Ghost theme and either upload it directly into Ghost or use a GitHub action to post it to your site.
- A Ghost site!
Now, without further adieu, let's begin!
What are you seeking to update?
Before making changes to your site, it's always essential to understand what you are seeking to update.
For today, here are the goals I have with today's site updates:
- Update my site to showcase more of the work completed in the past year and a half and highlight recent technical work I've done.
- Update fundamental style changes, add a for-hire page, and further explore the documentation.
Changing the theme + updating what I want.
I started with the Ease template I had heavily modified over the years. I loved the ease base template to keep my site organized, but now that I'm on the market looking for my next job, I wanted to highlight more easily a "for hire page" and ways to keep in touch with me.
Moving to a base template like Journal and then customizing it to my needs will not only save me time by giving me some of the core features I was looking for (easy side-bar call out and featured post on the top) but still retain what I love about the ease documentation theme (great categories and ability to highlight the breadth of different content I've published).
Setting up your theme and making sure you're ready to go!
You can download your theme from either GitHub or the Ghost Theme library and then upload it through the theme settings. This is how you'll be able to open it up in a code editor to make any theme changes that you might have.
Once your theme is uploaded — make sure that you have the theme selected and activated within your ghost theme library.
Here's a quick GIF on how to do that.
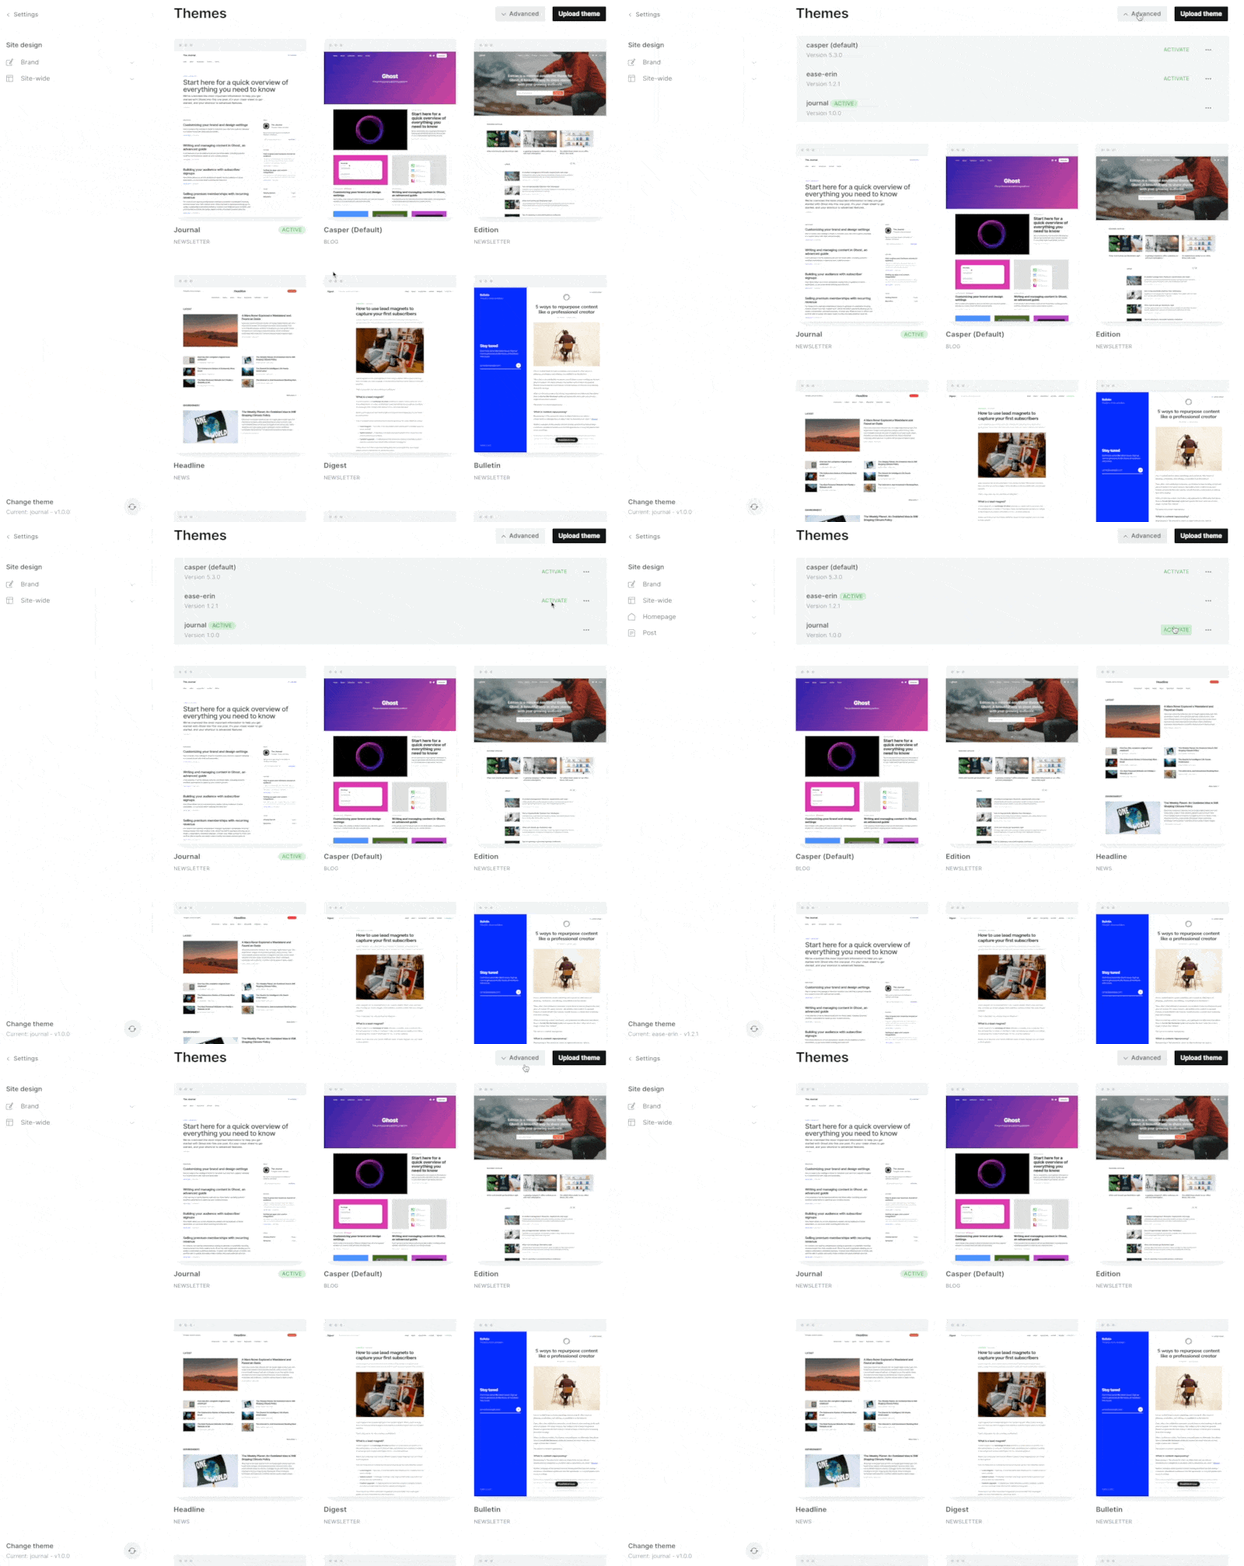
Since I switched over themes, I also need to ensure the folder still has specific files for the features I love. Opening up the file with my code editor and checking it, then previewing it in my local environment, is helpful for me to double-check and confirm that all files are correct.
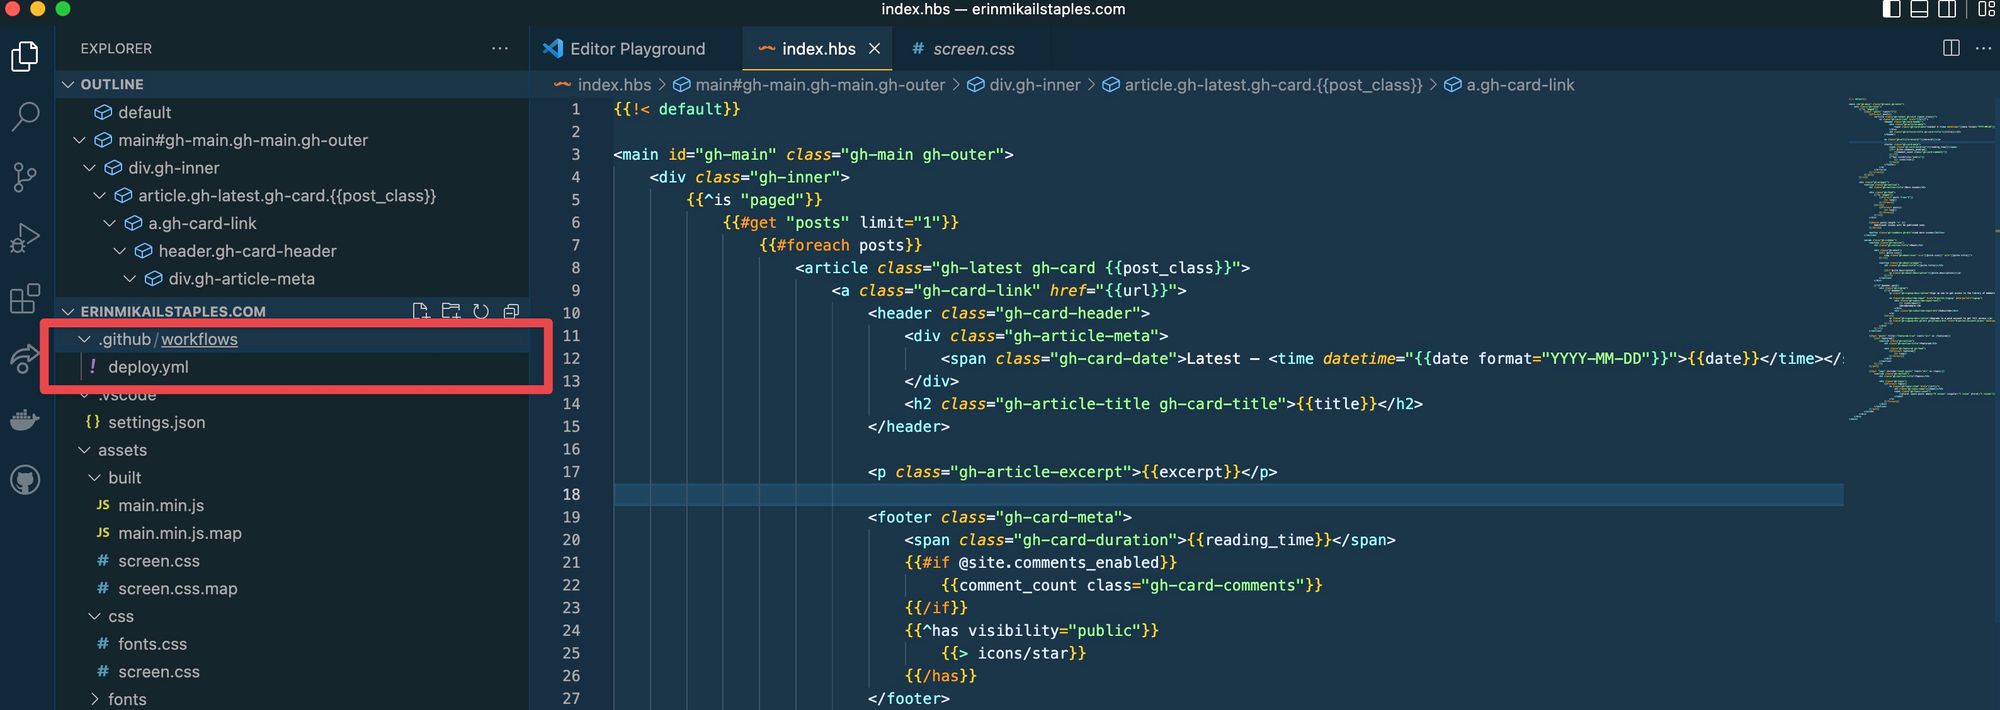
I use GitHub Actions to publish my theme from GitHub rather than manually uploading the theme each time. (pppsssstt — I followed this tutorial to set up the GitHub Action but found myself needing to make some minor changes to the .yaml file to work properly.)
When I open the file, I must ensure the .yaml file that creates the GitHub Action is still there. Now that I've double-checked this — I know I'm ready to start editing the theme and can see changes when I commit them, rather than needing to reupload the file each time.
Looking at the existing site and understanding changes
If we take a quick peek at the existing site — we can start to understand the different changes I want to make. Journal is great for a blogging site, but my needs right now are to showcase the work and skills I've done and how to get ahold of me. Below I've documented a few changes that I've made to best get ahold of me.
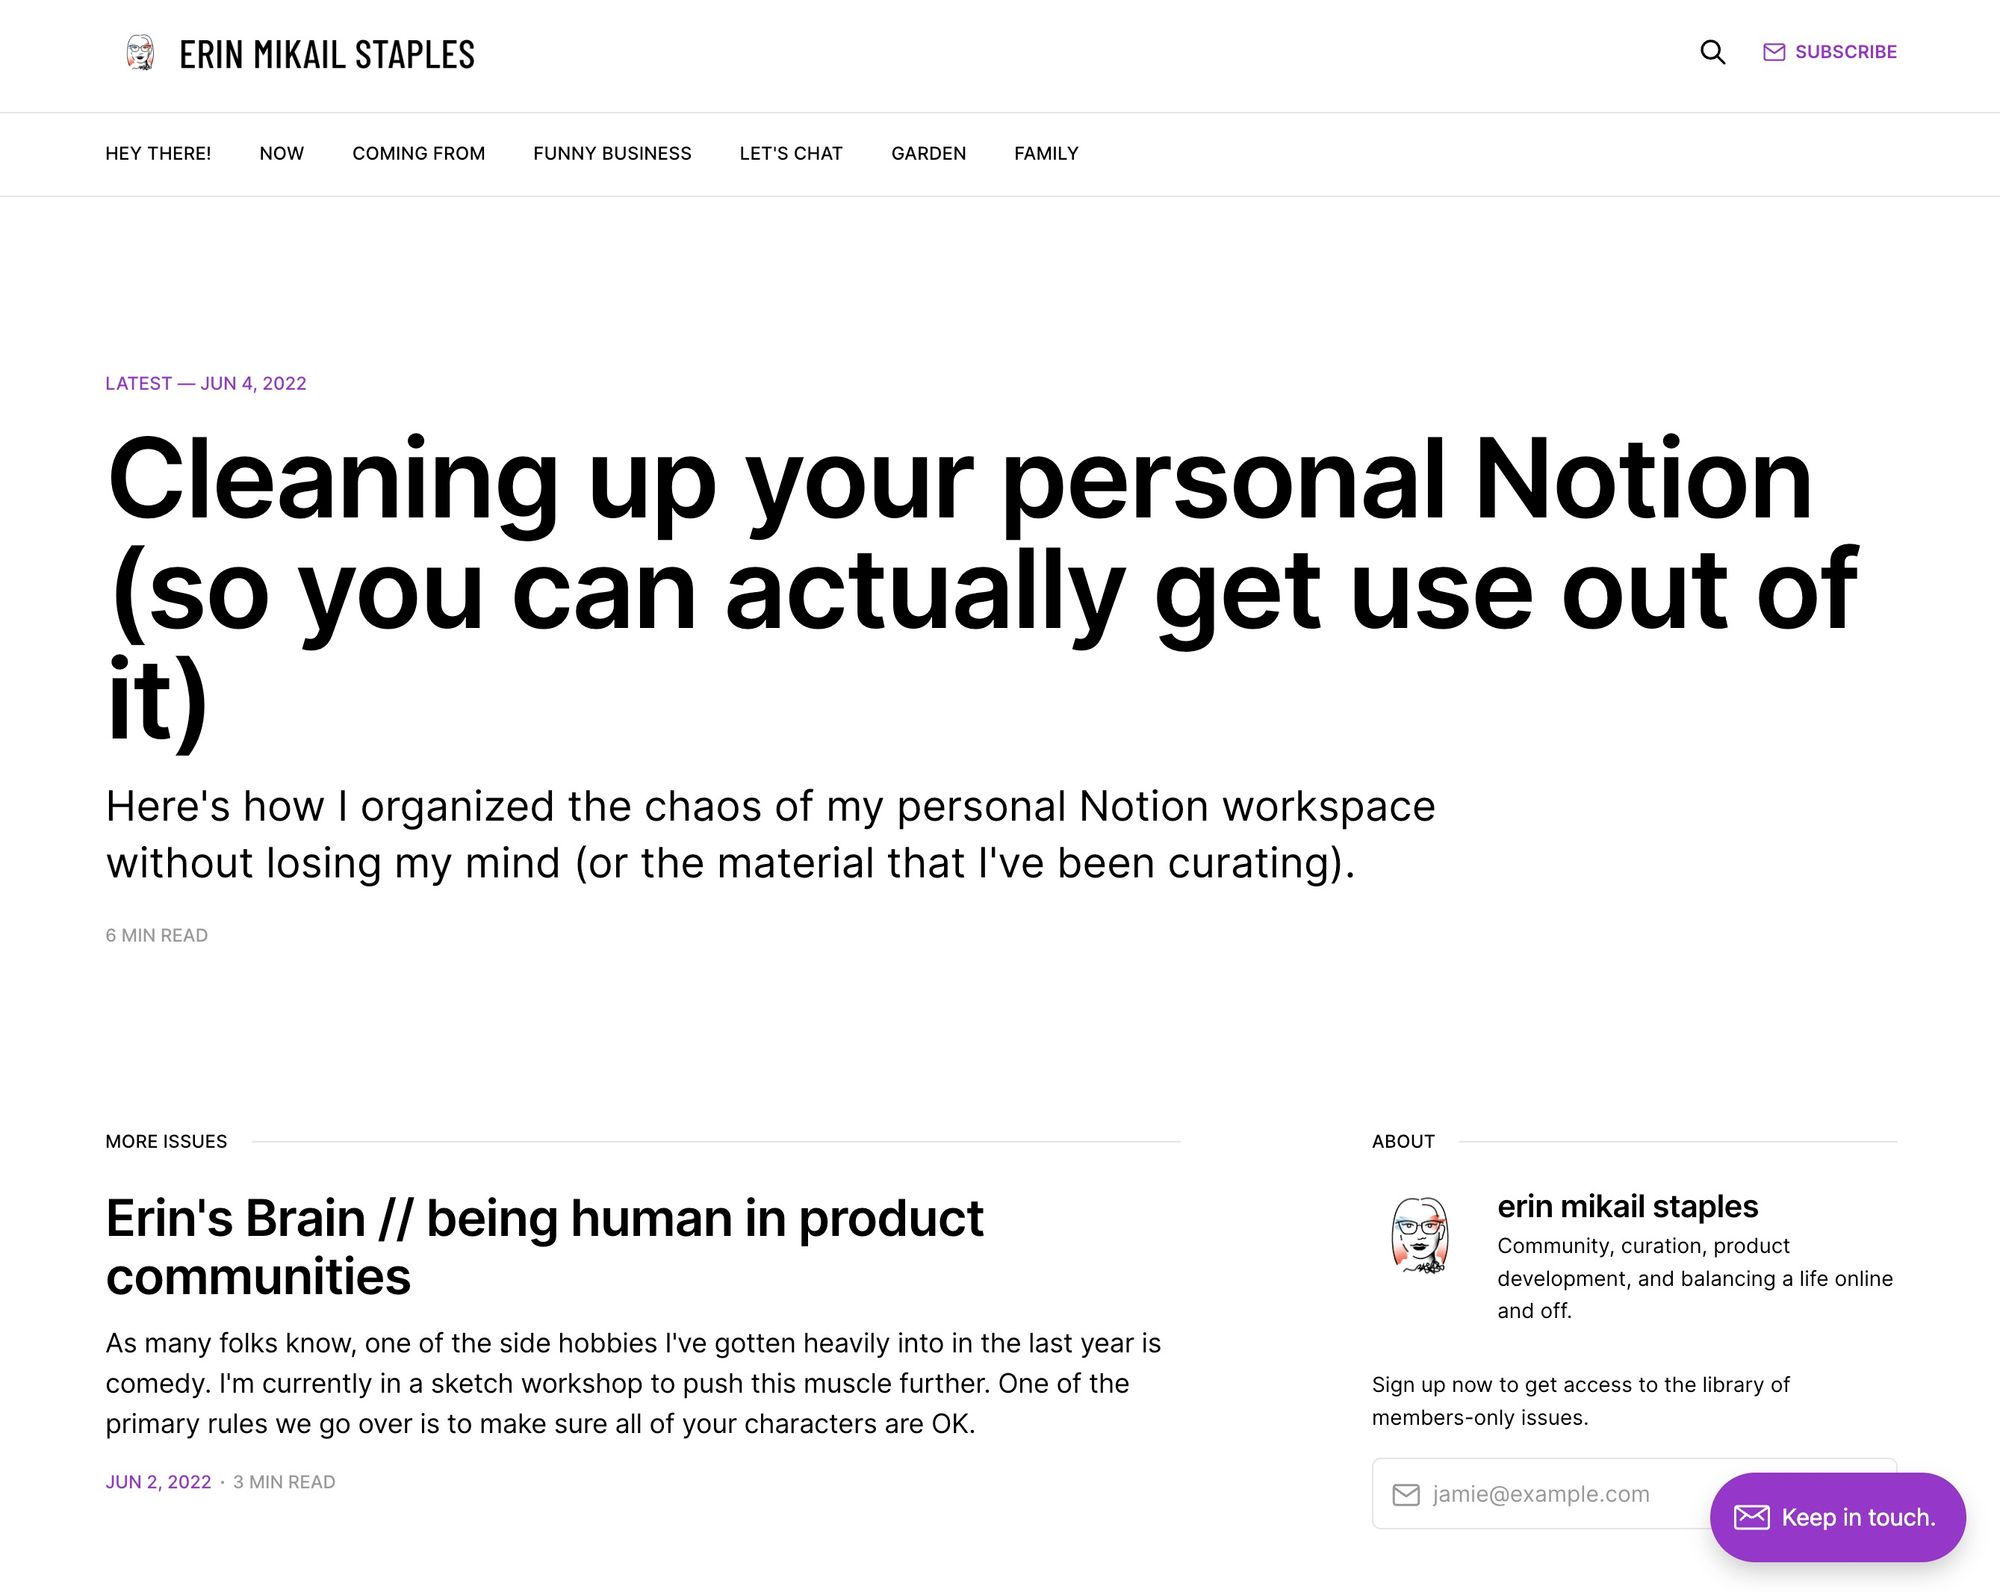
This site template highlights recent posts instead of a specific post or link to what I want. I would instead highlight a specific post.
Let's open our `index.hbs` file to modify our homepage.
index.hbs
The index.hbs file in any ghost template is your website's homepage.
To adjust this home block of the site, I'm looking right here at the top section, highlighting the latest post on my site. Instead, I would link to a specific position on my site, AKA, my for-hire page.
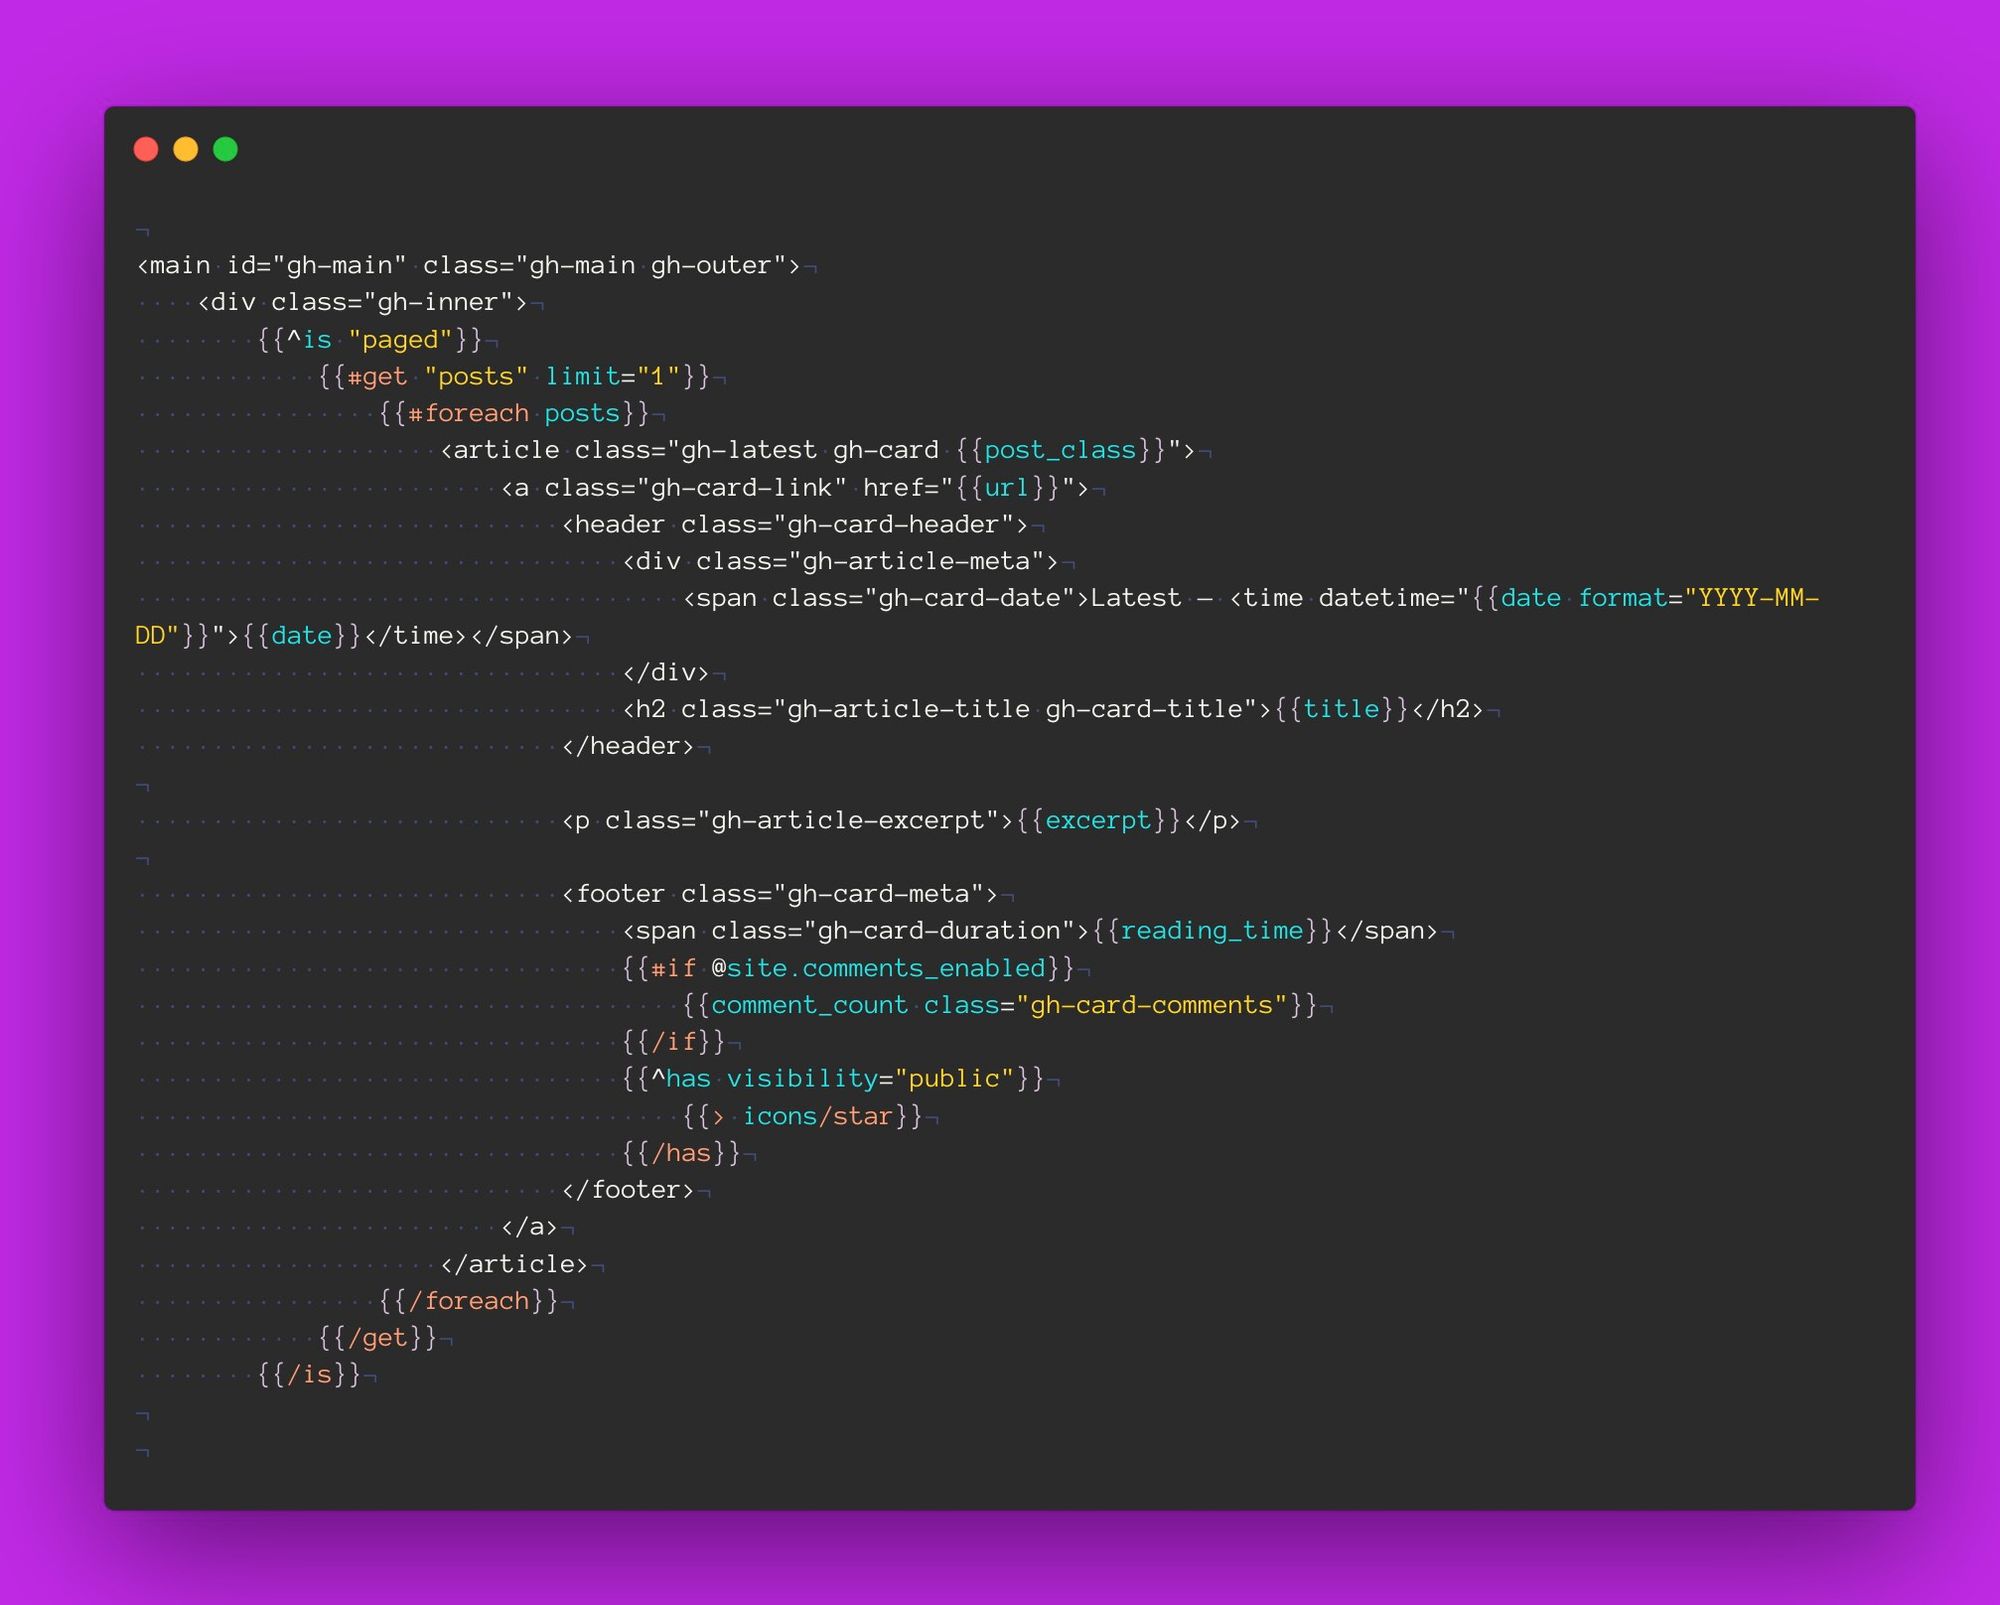
To do this, we'll have to modify the lines shown below.
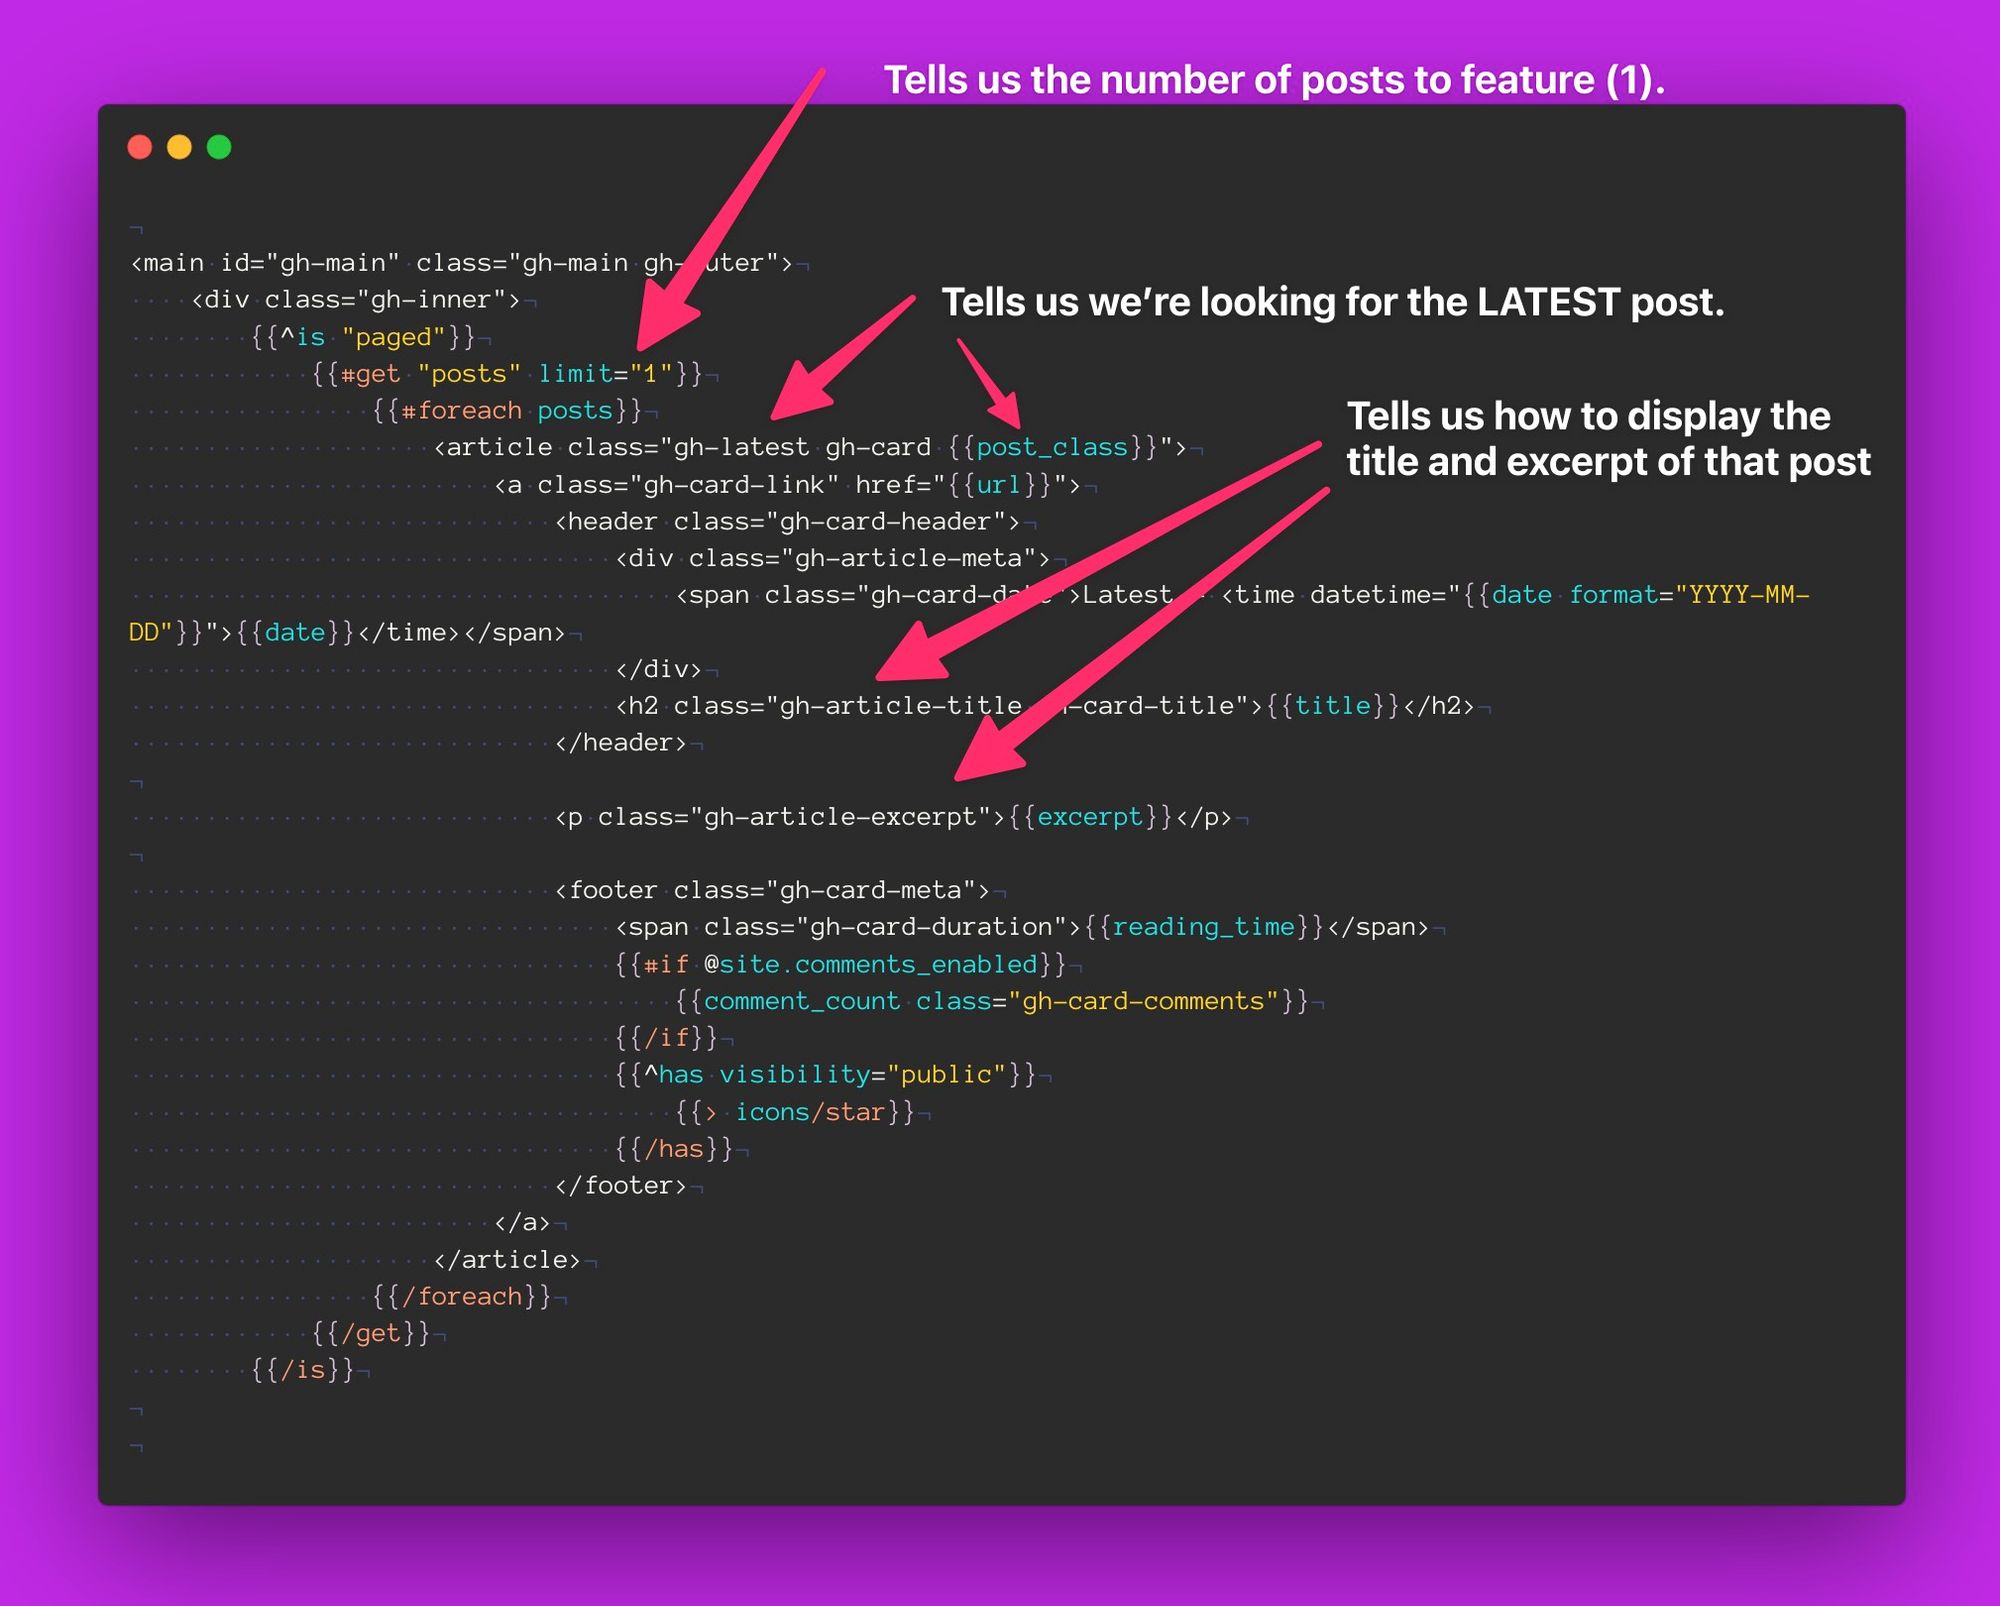
Ghost's docs are helpful when working with specific variables, which you'll find within the theme templates. When I started working with different blog post types, I found the `post class` documentation helpful to reference.
Publishing to my actual site
Once all of this is complete, I want to make sure items are all published and good to go on my site. Before gaining confidence in GitHub Actions, I used to do this manually through a code editor to edit the theme, then manually upload it again each time.
This process worked but didn't allow me to have the flexibility of going back to what I needed if I screwed up through version control provided by GitHub. The lack of version control led to 120000 versions of my site downloaded to a folder titled "website shit" on my desktop. 😅
Following this tutorial, I set up the GitHub action, automatically allowing me to publish updates from my code editor.
Here's a code snippet of my final deploy.yaml file that I was able to get to work.

That's all for now!
This is just a quick little preview of how I update my site and what I think about as I'm making site updates. My site is very much a continuous work-in-progress and my testing ground for my little development cycles.
Curious about using ghost or want to know more about developing your own site or ghost template? I'd love to hear from you!
Drop me a comment below or send me an email.